Homeschool Creations

Thursday, August 26, 2010

Tired of Being Anonymous?

Several many of you like to enter giveaways or ask questions…but I can’t get ahold of you to reply to your comment. There are several of you who have actually won a giveaway that I’ve held, but because you didn’t leave a comment, someone else won some lovely prizes.

Sad, but true.

You do not need to have a blog in order to have a blogger profile. Your profile can include two simple things ~ your first name and an email address.

If you have either a Gmail or hotmail email account, the set up is SUPER easy and quick {and if you don’t have a Gmail account, it is really easy to create one of those too!}. Go to the Blogger home page {blogger.com} and log in using your Gmail/hotmail email address and password. You will see a page that looks like this:

image

Click on the Edit Profile link and look for the part of the Profile page that says ‘Email Address’. You can change this email address to ANY email address that you would like to ~ meaning the one that you use on a daily basis {yahoo, aol, etc…}.

image 

Scroll up the page just a little bit and make sure that these two boxes are checked {the ‘share my profile’ and ‘show my email address’}.

image 

SAVE your changes!!

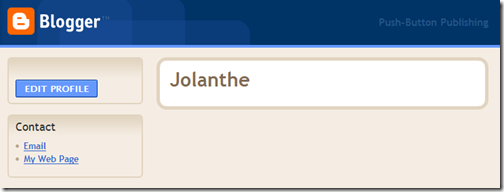
This is how your profile will look to others when they click on your name if you leave a comment on their blog.
image 

Now, whenever you leave a comment asking a question, your email address will be directly linked to that comment for only the blog owner to see so they can quickly reply to you!

On a side note, I have tried installing Disqus on my blog in the past, but had some major issues and got a little burned out trying to get it figured out. I love the ‘interactive’ feature that it allows in the comments and really hope that someday I can get it working..but that’s a project for another day!

Jolanthe Signature affiliate button

Labels:

Monday, August 2, 2010

Blogging Tips: Search This Blog

A few months ago I added a little something to my sidebar and it has been a HUGE help to me personally.

The search box. See it over there on the side?

image

If you are looking for something in particular, try typing in a keyword for what you need and see what you come up with. I have the search set to look on this blog and links that I have on the blog.

I’ve found more things that I forgot that I posted about, and it’s been a quick way for me to find posts rather than digging through my categories tag or even the archives.

Have fun looking ~ and hope you find lots of useful things! Let me know if you find anything really exciting. :)

Jolanthe Signature affiliate button

Labels:

Tuesday, June 22, 2010

Blogger Widget Title ~ Making It Blank

There’s a glitch in Blogger lately. If you edit or add an html widget {or any widget}, it’s requiring you to add a title.

Which really messes with my sidebar and how I want it to look.

BUT there is a quick {and easy} work-around if you happen to need one! In the title area type in this coding and it will allow you to save the widget and no wording will appear in the title area and mess up your pretty sidebars.

Ready?

<h2></h2>

It’s that simple! You’ll have to re-enter it whenever you edit your widget, but it’s a quick and simple way to fix it without pulling any more of your hair out. :)

Jolanthe Signature affiliate button

Labels:

Wednesday, June 9, 2010

Are You Using Windows Live Writer?

If you aren’t using it for your blogging, let me just tell you that you SHOULD be! Windows Live Writer has made blogging/posting so much easier for me and I am truly in love with the program! It is compatible with several blogging platforms {Blogger, Windows Live, Wordpress, LiveJournal, TypePad, and more}…but sorry to those of you who are Mac users. It isn’t compatible with Macs. :(

image 

Why do I love it so? Let me give you a few {or more} reasons:

1. I can blog anytime, anywhere without needing to be connected to the internet. All those post ideas swimming around in my head are saved as a draft in Live Writer and I can edit and add things when I think of more to add. This was a HUGE help to me when I was traveling and didn’t have constant access to the internet. I was able to write my posts and get them ready to go and then ‘publish’ them when I did have internet access.

2. I can post from multiple accounts. Live Writer allows me to create posts for all of my various blogger accounts. I don’t need to log into blogger, and with a simple click of a drop down menu I can switch accounts.

3. I can create template posts and use them as needed. There are certain posts of mine that use the same format. I love that I can click a button to pull a template that I’ve created/saved and all the same information pops up quickly without my needing to redo it all.

4. Photos and formatting is SO much easier! All it takes is a quick click of a button to add a photo, quickly resize it and even add watermarks and other special effects. When I publish a post, the picture automatically uploads to my Picasa account. This part alone has saved me so much time!

5. I can preview my posts. Live Writer offers the great feature of previewing your post so you can actually visualize what it will look like on your blog. This helps me see if there are any odd spacing issues before I actually post.

6. Editing after a post is up is simple! Live writer lets you ‘recall’ a post even after it has posted to your blog. Should I notice a spelling error {ahem} or anything else that needs to be fixed, I can do it quickly…and you all never even know!

7. My kids can also use it as part of their writing ~ without needing to be on the internet. Laurianna and McKenna both have blogs that are a part of my Blogger account. If they are online, they have access to my Blogger dashboard {and that could cause some unintentional problems!}. I have Live Writer set up on the kids computer so that they can blog away and publish to their own blog without even needing to be on the internet.

8. It’s FREE! Did I forget to mention that? When you download the program it comes with extra ‘add-ons’ that are unnecessary, so be sure to uncheck all the extra boxes when you download it.

9. I can add links quickly and easily to photos, text…anything. I can even specify that the link opens up in a new window.

If you'd like to see a video tutorial, Remarkable Blogger has a great Windows Live Writer tutorial.

What are you waiting for? I promise you it is a lovely, lovely thing…go check it out and have fun playing around with it! It is definitely something that Works for Me! If you are already using it, what are YOUR favorite features of Windows Live Writer?

Jolanthe Signature affiliate button

Labels: ,

Wednesday, June 2, 2010

Grab my Button {Code Box on Right} Tutorial

Several of you have emailed me wanting to know how I made the ‘grab my button’ code in my sidebar horizontal, instead of the typical coding underneath the image. I changed mine around using a table format to free up a little bit of space in my sidebar. The one that looks like this:

imageReady for me to share some html coding with you so you can make your own?  You’ll have to add in your own links and html, but here are the instructions. 

I added this as an html gadget from my Blogger dashboard {if you have another blogging platform, I’m sure you know how to add an html gadget, right?}. Be sure that your sidebars are wide enough before you try to install it ~ my button is 125x125 and the text box adds at least another 150 pixels. In general, my sidebars are 300 pixels wide, so if yours are only 150, this will not work right!

Click on this lovely little box and then click the ‘html/java script’ button that pops up:

image

Copy and paste the code below and drop it into that html box. Before you hit save, you’ll need to do the following to the code below:

1. Replace the blue parts of the code below with the http link to your image {if you use photobucket you will be using the ‘direct link’ coding.

2. Replace the pink parts of the code below with your blog/website address.

3. Replace the purple parts of the code with your blog/website name. For example, I would use Homeschool Creations {make sure you keep the quotation marks in the coding}.

Try it out!! Grab the code, replace the highlighted coding and try it out on your blog! Let me know how it works for you. :)


<table width="100%"> <tr> <td align="center"> <img src="http://imagelinkhere.com" alt="Your Blog Title Here" /> </td> <td align="center"> <textarea rows="6" cols="15"> <a href="http://yourblognamehere.com/" target="_blank"><img src="http://yourimagelinkhere.com" alt="Your Blog Title Here" /></a> </textarea> </td> </tr> </table>


Note: I changed the % width on mine to 90% to make it a little bit smaller.

Don't forget to join Homeschool Creations on Facebook too!

Labels: ,

Wednesday, May 12, 2010

Sharing is Caring Widget

You may have all noticed the little widget that I have at the bottom of my posts. Several of you all have emailed and asked how I put it there ~ and others of you might wonder what in the world it’s there for. I like it because it pops-up, but that’s just me}. This is the one that I’m talking about:

Sharing is caring social bookmarkWhy use social bookmarking tools?

Social bookmarks are a great way to organize and search through various web resources ~ basically just sharing great references that you find. You can keep your bookmarks private or share them with others.

~ quick way to share links with others via Facebook, Twitter, email and morewhen you find something that you really like

~ great way to save information for future use {I store things I find for later in our studies}

~ can email yourself or others a great link that you find ~ I do this with recipes or fun game ideas

Want to add the sharing widget to your own blog? I opted for the ‘Sharing is caring!’ logo rather than the original ‘Sharing is se*xy ~ just didn’t seem to fit the overall theme of my blog, you know?  Here are two great tutorials that will show you:

Sharing Social Bookmark Tool ~ this is the main tutorial that even includes blinking text to show you where you need to insert your own links {facebook, twitter, email, etc…}.

Sharing logo ~ this post provides the image code to use to replace the image with the ‘Sharing is Caring!’ image

You can also choose to delete the ‘sharing’ image and just have the buttons all by their little lonesome. Find the following code in your html {once you have the above coding installed} and change it as below.


background:url('http://i43.tinypic.com/2ueii3t.png') no-repeat left bottom;
position:relative;

Replace the line in red above with the following line:

background:url(;) no-repeat left

Note: Several of you have asked too about my widget being shorter than the one in the tutorial. I deleted several of the ‘pop-up’ buttons. For example, in the first part of the tutorial {the long coding section}, I deleted the sections that I didn’t want buttons for {reddit, yahoo, etc…}.

If you’d like the html coding that I used for the second section, please leave a comment with your email address and I can send it to you. I removed it because of some of the emails I was receiving ~ not exactly ones I’d like to get!

That’s it! Have fun installing it!

Labels:

Tuesday, March 30, 2010

Removing the “Showing posts with…” Label

I'm not super fond of that little box that shows up at the top of searches that I do for specific topics on my own blog. Pretty much unnecessary for the most part.

This is the one that I’m talking about:image

Want to know a quick and easy way to remove it?

1. BACK UP YOUR TEMPLATE. I know it seems easy, but trust me ~ you just never know!

2. In your Blogger account, go to DASHBOARD ~ LAYOUT ~ EDIT HTML  and be sure to click the little box that says ‘expand widgets’.

image 3. Find the following block of coding in your html {you can copy the first line and use the CTRL + F keys to find the line}:

<b:includable id='status-message'>
<b:if cond='data:navMessage'>
<div class='status-msg-wrap'>
<div class='status-msg-body'>
<data:navMessage/>
</div>
<div class='status-msg-border'>
<div class='status-msg-bg'>
<div class='status-msg-hidden'><data:navMessage/></div>
</div>
</div>
</div>
<div style='clear: both;'/>
</b:if>
</b:includable>

4. Replace the above coding with the following block of coding:

<b:includable id='status-message'>
<b:if cond='data:navMessage'>
<div>
</div>
<div style='clear: both;'/>
</b:if>
</b:includable>

5. Save your template and the box will be gone!

Labels:

Sunday, March 7, 2010

I Can’t Answer You!!

Some of you have been asking me some questions in your comments and as much as I would love to reply ~ I can’t!!

Many of you do not have an email address linked to your comment, so there is no way for me to reply personally to you. The return email address for your comment reads “noreply-comment”.

You can QUICKLY fix this by clicking just one little box. Go to your user profile and check the box where it says ‘show my email address’. No one else will be able to see your email ~ except the person you are leaving a comment to.

 
I promise it's safe - do you have your little box checked? I'll know if you comment! :)

Labels:

Thursday, August 20, 2009

You Asked! ::2::

I answered a few of your questions a few weeks ago and after that had another round of questions that were asked about various things. If your email address is linked to your comment, I do try to reply to you ~ but sometimes the questions are asked by several people so I'll occasionally answer questions in post form too so everyone can see the answers.

Today's questions are focusing on blogging tips ~ just a few though. Quite a few of you asked about making your own blog buttons and I'll have to go through that step-by-step another time {or point you in the direction of another great post about it!}.

Q: How do you change your blog layout or template without messing everything up? I hate using the standard blogger template but I am afraid to mess something up and lose all my work!

A: I have a 'test blog' - it's hidden so nobody can see the mess that it is. My test blog was created so I could freely play around with the html or template and not worry about wreaking blog havoc. On my test blog, I try out new buttons, headers, or layouts BEFORE I actually make the switch on either of my blogs ~ and it has saved me from a lot of trouble. :) Since you can create free blogs with Blogger - it wasn't a big deal to create it. Once I know it is safe, I can easily cut/paste the html and update my actual blog without worry.

And always be sure to back up your template before making any changes. Always. I have a Word document saved in my files with the current html for both of my blogs. Just in case. And we won't even talk about the fact that I messed up my blog because I didn't follow my own instructions once. Nope, we won't.

Q: How do I add those "you might like..." boxes?

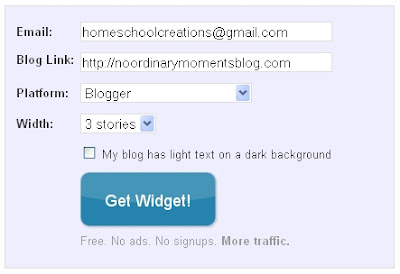
A: This is so very easy. Visit the Link Within website and they will literally walk you through the process. You enter your email, blog address, and what blogging platform you use and click "get widget".


You can either use the code they provide and add your own widget following their directions, or you can let them do it for you. It's that easy!

Q: How did you get your blog to three columns?

A: Really, the answer isn't something you are going to like. How I did it ~ and how I'll recommend you do it are two completely different things. I have a bad habit of fiddling with my html. Very bad. Especially since I just play and learn and to stop and tell you what I did or how I did it....I'm not always entirely sure.

Here are a few places I would recommend that you check for free templates of 3 column blog templates:
There are a few places to get you going - but you will have to install the code yourself. :) Have fun looking!

Photobucket

Labels: ,

Tuesday, July 7, 2009

Centering Blog Sidebar Buttons

You know those cute little buttons over in people's sidebars? You know how when you put one in your sidebar sometimes it might be centered in the sidebar....or all the way over to the left of the column....and then they end up all funky looking? Or maybe you put them on your sidebar and they all clump together with no spaces between them?

Does it drive you nuts? Well, it drives me nuts and I get a little, ummmm...particular about having things 'just so'. 'Cause I'm just picky like that.

If you want to center those buttons in your sidebar, be sure to add the following html code when you copy/paste their button code:

Place this before the code: <center>

And place this after: </center>

If you would like to add some spaces between your blog buttons here's a quick and easy way. Between the two codes at the following: <p></p>

Quick and simple....now go fix your sidebars!


Photobucket

Labels:

Wednesday, June 10, 2009

How to Add an 'Email Me' Link to Your Blog

I've had several people email me asking how to put a link in their sidebar so their readers can contact them directly. Having an icon link is helpful because it prevents spammers from 'seeing' your email address, but provides a quick, easy way for direct contact.

Somehow that question managed to get me off on a bunny trail search of cool icons and I figured it would be just as fun to post some fun buttons for you all to grab and use on your own sites and explain it all to you as simply as I can. Because really ~ icons are so much more fun that just a plain old 'Email Me', right?

Are you ready to put one on your blog?

Step 1: Choose the icon below that you like the best ~ mailbag or envelope? Each of these will fit into your sidebar (150x150).

Step 2: Depending on which button you want to grab copy and paste the html code below. Be sure to replace the red text with the email address that you would like to direct your readers to.

Mailbag html {with white background}:

<center><a href="mailto:youremailhere@wherever.com">
<img src="http://i678.photobucket.com/albums/vv146/homeschoolcreations/EmailMeMailbagcopy.jpg"/></a></center>

Envelope html {with white background}:

<center><a href="mailto:youremailhere@wherever.com">
<img src="http://i678.photobucket.com/albums/vv146/homeschoolcreations/ContactMegeneric.jpg"/></a></center>

Mailbag html {with transparent/see-through background}:

<center><a href="mailto:youremailhere@wherever.com">
<img src="http://i678.photobucket.com/albums/vv146/homeschoolcreations/Email-Me-Mailbag-gif.gif"/></a></center>

Envelope html {with transparent/see-through background}:

<center><a href="mailto:youremailhere@wherever.com">
<img src="http://i678.photobucket.com/albums/vv146/homeschoolcreations/Contact-Me-gif.gif"/></a></center>


Step 3: Paste the code into your layout. If you use Blogger, log into your Blogger dashboard. Go to layout ~ add a page element ~ choose 'html/javascript' ~ paste the code above and click 'save the changes'. Make sure that you changed the email address to your own! :)

I'm not sure how other blogging platforms work, but you should be able to copy/paste the html codes above. {Amended: Thanks to Liz for letting me know the Wordpress routine! Go to Dashboard - Appearance - Widgets - Choose left or right sidebar - Add Text - Save Changes - Edit Text - Enter html code and change to your email address.}

Step 4: View your blog and admire your handiwork...and wait for all your readers to bombard you with questions.

There you have it. Either four easy steps to make you feel like an html queen...or four steps to driving you html crazy. If you are having problems just click on my 'contact me' mail bag or leave a comment here. Have fun!


Just wanted to pass along a little something that is Working for Me!

Photobucket

Labels:

Saturday, January 3, 2009

Can I Ask a Favor?

Recently I discovered that I was making it difficult for others to reply when I commented on their blogs. Had I know that it was so simple, I would have checked the box off much earlier!

I love getting comments from you all and being able to email you back, but for some of you all, the return email is "noreply-comment" and then I try to figure out where you all are - and I would love to visit your blogs too and be able to reply directly to your questions.

It really rather quick, easy and simple to let others reply to your comments. All you have to do is check a little box that says "show my email address" in your user profile. It won't show up for anyone to see, except the person who's blog that you posted on so they can reply directly to you.


I promise it's safe - do you have your little box checked? I'll know if you comment! :)


Labels: